TeslaUSB - A Fully Automated Dashcam Storage Device
TLDR; I installed and configured TeslaUSB on a Raspberry Pi Zero W in about 20 minutes and it WORKED! Our Model 3 sees the RPi as a USB Storage device and stores DashCam clips just as it should. When I return home, the TeslaUSB connects to my WiFi and uploads anything in the SavedClips or SentryClips directory to my Network Attached Storage device, then deletes them from the device – so I don’t have to.
The long version:
If you haven’t heard yet, there’s another option for dashcam storage besides using a flash drive, SSD or Micro SD card. Some ingenious dude whose github handle is cimryan worked out a way to use a Raspberry Pi in place of your dashcam flash drive. Not only that, the Pi can also hold your music files AND it can repair any filesystem corruption that occurs on it if Tesla does not properly unmount the drive before going to sleep.
But wait . . . there’s more . . .
Github user marcone took that code and added support for Tesla firmware 2019.x plus the ability to save more than an hour of recordings and export those recordings to any system supporting a CIFS share. His port will also allow you to use one of a number of third-party apps to receive notification when the archive process is complete and adds the optional ability to create a WiFi hotspot so you can access the recordings on the go. Oh, and those music files I mentioned? marcone’s version of TeslaUSB will allow you to sync your music to a CIFS share. But, perhaps the best improvement marcone made was to the installation. It’s basically a very simple one step setup (well, perhaps a bit more than just one step).
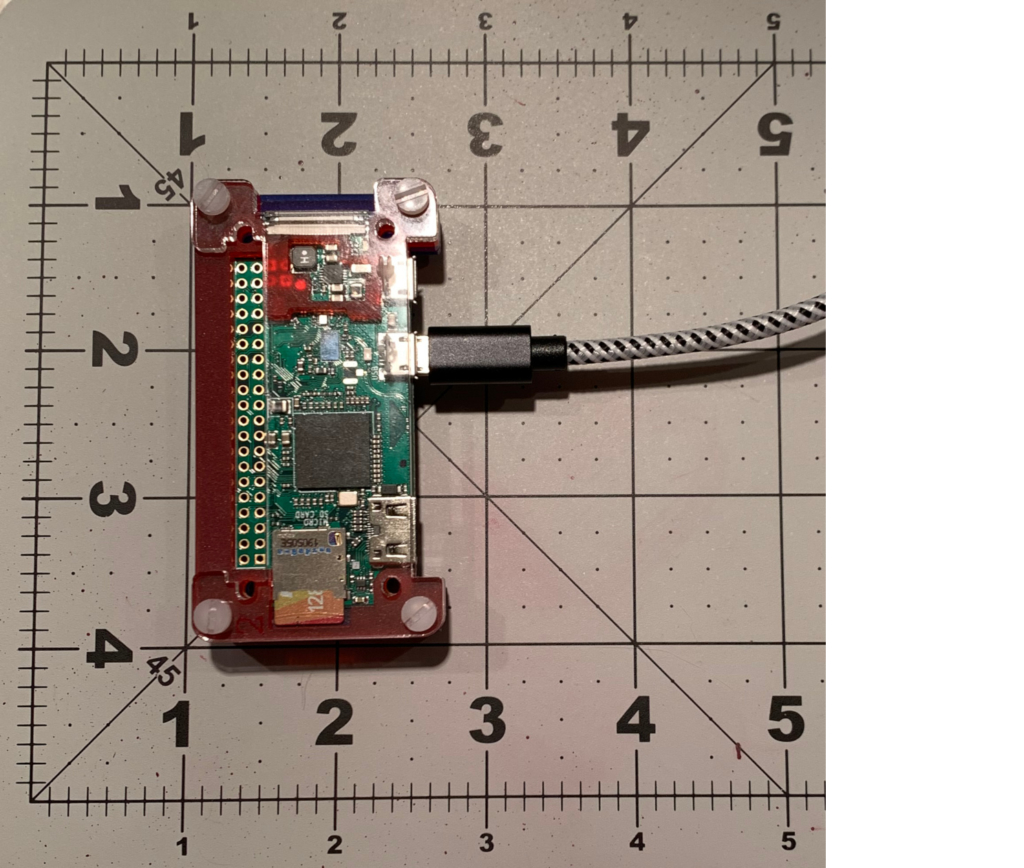
So, I bought the requisite materials:
Raspberry Pi Zero W
MicroSD card
USB-A to Micro-B cable
Protective Case for Pi (optional)
and now I’m going to install and configure my TeslaUSB as I write this blog so, . . . please bear with me.
The One Step Setup actually consists of a couple very simple instructions. The first is to flash the latest image onto your MicroSD card using Etcher or similar software.
The link in the instructions takes me to a page that contains a “Pre-Release” version of the code, the “Latest Release” and various previous releases. Prudence dictates we use the latest stable release (rather than the Pre-Release version) so that’s what I’m going to do. But first, a word about my environment: I’m doing all this on a 2018 Macbook Air writing to a 128GB Povee MicroSD card inserted in an Anker microSD card reader. If the software works as it should, then 128GB is probably overkill but it’s what I had on hand.
The flash of the card succeeded but, when it finished it left the card unmounted. Following the instructions, I’ve remounted the card and it shows up as a drive with the name “boot”. Now the instructions say to create a file named teslausb_setup_variables.conf in the boot directory of this drive. Fortunately, there is already a sample of this file in the boot directory so we only have to copy and rename it (or simply rename it, if you’re not concerned about losing the original content). I’m going to edit the file using the Mac Text Editor.
The first problem I encounter is when I try to save the config file. I get a popup informing me that I ‘don’t have permission’ to save the file. This is likely just a matter of modifying the permissions on the file but let’s see if I can do that.
Looks like that was a false flag because I closed the file and reopened it to find all my changes were there. I made a few more changes and saved it without trouble. This might have all been about the fact I opened the sample file originally, then renamed it in the editor.
If you’re wondering about my configuration, I’m planning to backup to a Western Digital My Cloud Mirror network drive. I’m not completely sure what some of the config values should be for this but for starters I’m using this:
export ARCHIVE_SYSTEM=cifs
export archiveserver=WDMyCloudMirror (as it displays in my network)
export sharename=jerry (my personal directory on the server)
export shareuser=xxxxxxxx@gmail.com (my My Cloud user name/email)
export sharepassword=xxxxxxxx (password associated with that user name)
export camsize=100%
export musicsize=20G
export SSID='XXXXXX' (my network SSID, of course)
export WIFIPASS='XXXXXX' (my network password)
export timezone="America/Los_Angeles" (my actual timezone)
Everything else is commented out.
After saving the config file and closing TextEdit, I ejected the device named ‘boot’, removed the microSD card from the reader and inserted it into the Pi Zero. I plugged a cable into the micro USB port labelled ‘USB’ on the Pi and the other end into my Mac Book and waited. The instructions tell you to watch for flashes from the LED – four different sequences indicating the following:
2 – Verify requested configuration is creatable
3 – Grab scripts to start/continue setup
4 – Create partition and files to store camera clips/music
5 – Setup completed; re-mounting filesystems as read-only and rebooting
What the instructions don’t say is that the same LED will flash continuously for about five minutes (sort of like a the hard drive light on a PC) while the Pi is working through the first bit. If you watch it closely, you will see it stop flashing, then flash twice, then do some more continuous flashing, stop and flash three times, then go dark for a bit, come back and flash four times, go dark again for a few seconds and come back to flash five times. When it’s done, the LED will settle into a steady sequence of two flashes about every second. This, we’re told, is the archive loop.
At this point, you can verify your Wifi connectivity by attempting to logon to the Pi using ssh. I opened a terminal on my Mac and typed
ssh pi@tesla.local
Here’s what came up in the terminal window:
Last login: Tue Dec 31 14:18:41 on ttys000

The default interactive shell is now zsh.
To update your account to use zsh, please run `chsh -s /bin/zsh`.
For more details, please visit https://support.apple.com/kb/HT208050.
Mac-N-Cheese:~ jerry$ ssh pi@teslausb.local
The authenticity of host 'teslausb.local (2601:1c2:8100:7b54:3668:68cc:8c9f:8130)'
 can't be established.
ECDSA key fingerprint is SHA256:gBpQcW6fhhvri/ZIgd6HhCnZbqT25rlGNfu8emJ66Ac.
Are you sure you want to continue connecting (yes/no)? yes
**** I responded ‘yes’ because I know who I’m connecting to.
Warning: Permanently added 'teslausb.local,2601:1c2:8100:7b54:3668:68cc:8c9f:8130'
 (ECDSA) to the list of known hosts.
pi@teslausb.local's password:
Linux teslausb 4.19.50+ #1234 Thu Jun 13 10:47:38 BST 2019 armv6l

The programs included with the Debian GNU/Linux system are free software;
the exact distribution terms for each program are described in the
individual files in /usr/share/doc/*/copyright.

Debian GNU/Linux comes with ABSOLUTELY NO WARRANTY, to the extent
permitted by applicable law.

SSH is enabled and the default password for the 'pi' user has not been changed.
This is a security risk - please login as the 'pi' user and type 'passwd' to
 set a new password.

Mac-N-Cheese:~ jerry$
**** Following the advice in the instructions, I will issue the ‘passwd’ command and change the password to something only I know.
Uh oh. Look what happened:
pi@teslausb:~ $ passwd
Changing password for pi.
(current) UNIX password:
Enter new UNIX password:
Retype new UNIX password:
passwd: Authentication token manipulation error
passwd: password unchanged
pi@teslausb:~ $
I’ll try rebooting to see if that helps.
Nope, no joy. I’m going forward for now with the default password. I’m sure I’ll be able to change the password once I do some research on this message but I don’t want to hold up the project.
According to the instructions, the /boot directory should contains files named TESLAUSB_SETUP_FINISHED and WIFI_ENABLED. I see both so I guess we’re good. Time to install the unit in my Model 3 and see if it actually works.
At this point, here’s what we’re expecting.
1. When I plug the Pi into the USB port on my Model 3, the camera icon will appear at the top of the touchscreen with a red dot to indicate it is ready to record.

2. After some driving, when I return home and the Pi is able to connect to my home network, we will eventually see some dashcam clips appear under the share ‘jerry’ on my WDMyCloudMirror server.
That’s the most basic function of the TeslaUSB project and it’s all we’ve configured it to do . . . for now. Let’s see if I get at least that much.
When I plugged in the Pi, I assumed it would take a bit longer to register than the flash drive I’d been using and I was correct. By my watch, it took about 90 seconds from the time I plugged the Pi into the USB port until the camera icon (with red dot) appeared at the top of my touchscreen.
I went for a short drive, came back and parked in the garage then checked to see if anything was being written to my file server. Nothing. I pretty much expected this because I wasn’t really certain about the parameters for the archive. I logged onto the Pi using ssh and then went to the wiki to find out what logs I should be looking at to troubleshoot the problem. But I saw something in the Wiki that made me realize that I hadn’t really conducted a proper test. It was a line that says, “Only saved clips (this includes both manually saved clips and clips saved by Sentry mode) are archived.” I realized that I hadn’t parked anywhere so Sentry mode wouldn’t have created any recordings and I hadn’t actually saved any clips (by tapping the camera icon) so there was nothing for the Pi to archive.
Back out again . . .
This time I made sure to tap the camera icon a couple times so I would definitely have some saved clips for the Pi to archive. I parked for a few minutes at the local market and did some light shopping. I was in long enough for someone to trip the Sentry alert so I got some footage there. When I came home – Voila! I looked at my share on the file server and I could see the Pi had created a folder named ‘SavedClips’, another called ‘SentryClips’ and it was actively storing some recordings. I viewed a couple just to make sure they were not corrupted.
SUCCESS!!!!
My TeslaUSB will now provide a place for our Model 3 to store all its dashcam footage while I’m out and about. When I come home and it detects my home network, it will archive all the saved clips it has stored, then remove them from its own storage area. All of this is done automatically, with no intervention by me. This means I don’t ever have to remove the device from the car and I don’t have to worry about it running out of storage! Thank you cimryan and thank you marcone!
That’s all for this blog entry but check back because I’m going to add some of the other features and see if we can get – I don’t know, notifications maybe?
Stay tuned.